First, what an MCP is, without the jargon
MCP stands for Model Context Protocol. The idea is simple: it’s a bridge that lets an AI assistant talk to a tool you already use.
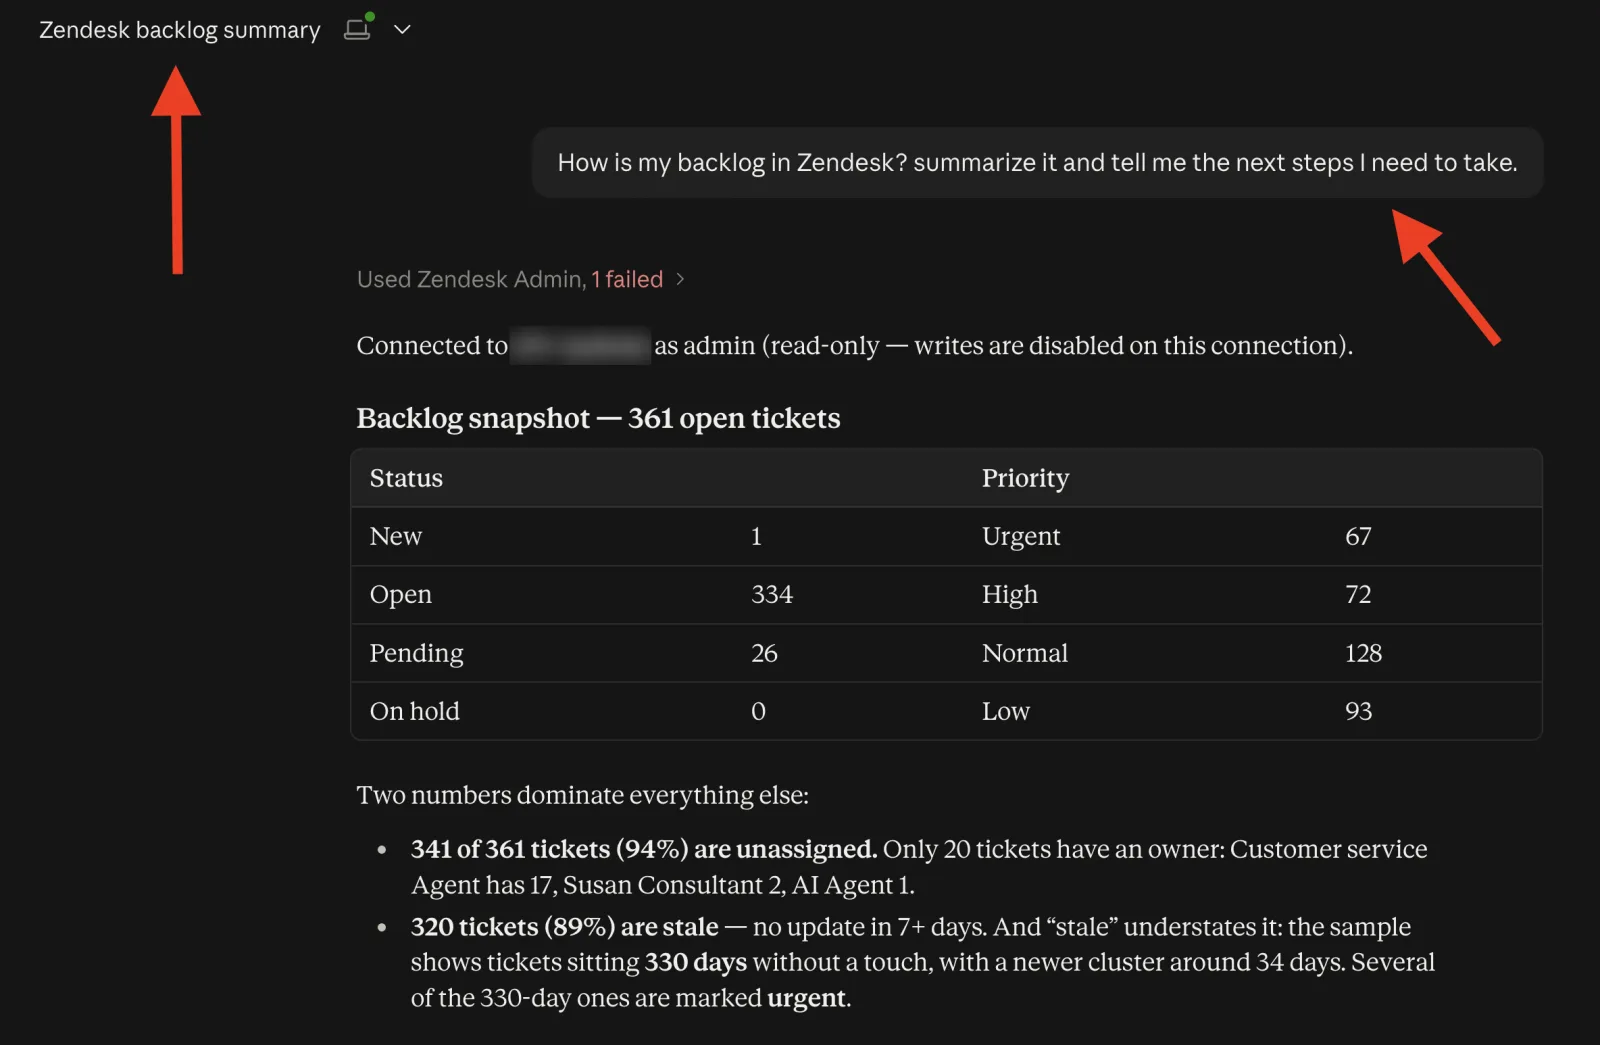
Without that bridge, Claude can explain how Zendesk works, but it can’t look at your account. With the bridge, you ask “how many urgent tickets are unassigned?” and it goes, checks, and answers with your real number.
It’s not magic and it’s not a model trained on your data. It’s a connection. Your information stays in Zendesk and the assistant only asks what you tell it to ask, with your same permissions. That’s all you need to understand to use it.
Then, the decision that mattered most: keeping it small
This is the part I want you to take away even if you never install anything. I was tempted to wrap the entire Zendesk API, but that’s hundreds of endpoints. I could have built a server with two hundred tools and bragged about something more complex, but what for? That wasn’t my goal. Can I do it? Yes, but that’s not what I was after here.
Besides, when an assistant has two hundred tools available, it chooses worse. It gets overwhelmed, hesitates, and ends up using the wrong one or asking you to clarify what you already told it. Fewer, well-thought-out options work better than many options.
So instead of asking “what can the API do?”, I asked “what eats my time on Mondays?”. Four areas came out of that, and thirteen tools came out of those four areas.
Next, research before writing a single line
The second thing I did was boring but decisive: read the Zendesk API documentation before coding, not during. And since I’ve been developing with Zendesk for years, it was easier because I already knew the API. Boring, yes, but not complicated.
I’m telling you this so you avoid mistakes like these:
- Pagination. Zendesk has two ways to paginate results. The traditional one has a ceiling of ten thousand records. If your account has more tickets than that, the audit would have lied to you without warning.
- Rate limits. Zendesk cuts you off when you ask for too much per minute and tells you how many seconds to wait. If you don’t respect that, the server falls over right when you’re using it the most.
- API tokens are deprecated. Zendesk’s own documentation says an API token can impersonate any member of the account, administrators included, and recommends OAuth. For personal use the token works, but that warning changed how I designed the security.
In parallel, security: three layers and none of them optional
I didn’t leave this for the end, and I think it’s what separates a toy from something you dare to connect to your real account.
- Your same permissions. The server can never do more than that user could already do by logging into the interface. If you want a read-only server, you give it the token of a user with read permissions and that’s it.
- Almost everything is read-only. Of the thirteen tools, eleven only read. The two that change things (reassigning tickets, suspending a user or changing their role) fail with a clear message until you enable them on purpose.
- A dry run first. Even once enabled, those two first tell you what they would change without touching anything. You have to ask again for it to actually run.
To me this is the most important decision in the project. An AI assistant with write permissions on your Zendesk and no brakes is a terrible idea, no matter how well it works ninety-nine percent of the time.
And before calling it good, testing it three ways
- Offline tests. They run without credentials, simulating Zendesk’s responses. They check that authentication is built correctly, that pagination walks through every page, that after a rate-limit cutoff it waits as long as it should, and that the write lock works in both directions.
- Real startup. A test that actually boots the server and confirms the thirteen tools register correctly.
- A test against your Zendesk. A script that calls your real account and tells you, one by one, which endpoints respond with your token. It’s more useful than it sounds: it warns you up front if your plan doesn’t include something, instead of you finding out when a tool fails.
Now the cool part: what you can do with it
Thirteen tools, in five groups. In plain language:
Search tickets
- By ticket number, by customer email, by subject, or by the contact’s phone number.
- The last three can be combined: “tickets from ana@company.com about billing”.
Clean up your configuration
- Which triggers and macros haven’t run in a month.
- Which are switched on but do nothing.
- Which are duplicated or haven’t been touched in months.
- Which ticket fields nobody uses.
Know how operations are going
- How many tickets are open, by status and by priority.
- How many have no owner and which ones have been sitting idle too long.
- Who on the team is carrying the most load.
- Which SLA policies you have and with what targets.
Review security
- Who has administrator permissions.
- Which access tokens haven’t been used in months and which apps are installed.
- What changed in the configuration last week and who changed it (Enterprise plan only).
When someone leaves the team
- What was left pending in their queue, which groups they belong to and when they last signed in.
- Move their tickets to someone else.
- Suspend their access.
And something I didn’t expect to be so useful: all of the above is asked in plain language. There are no commands to memorize. You type “audit my triggers looking for dead rules” and that’s it.
How to install it
You need three things: your computer, Python 3.10 or higher, and administrator permissions in Zendesk.
1. Download the project
git clone https://github.com/Grjhoan/Zendesk_MCP_Server
cd Zendesk_MCP_Server
python3 -m venv .venv
source .venv/bin/activate
pip install -e .
2. Create your token in Zendesk
In your account: Admin Center → Apps and integrations → APIs → Zendesk API → Settings. Enable Token access and create a new token. Copy it right then, because Zendesk won’t show it to you again.
Remember that this method is being phased out, so you should switch to OAuth. I used the token to test quickly, but it’s not the recommended way.
3. Configure it
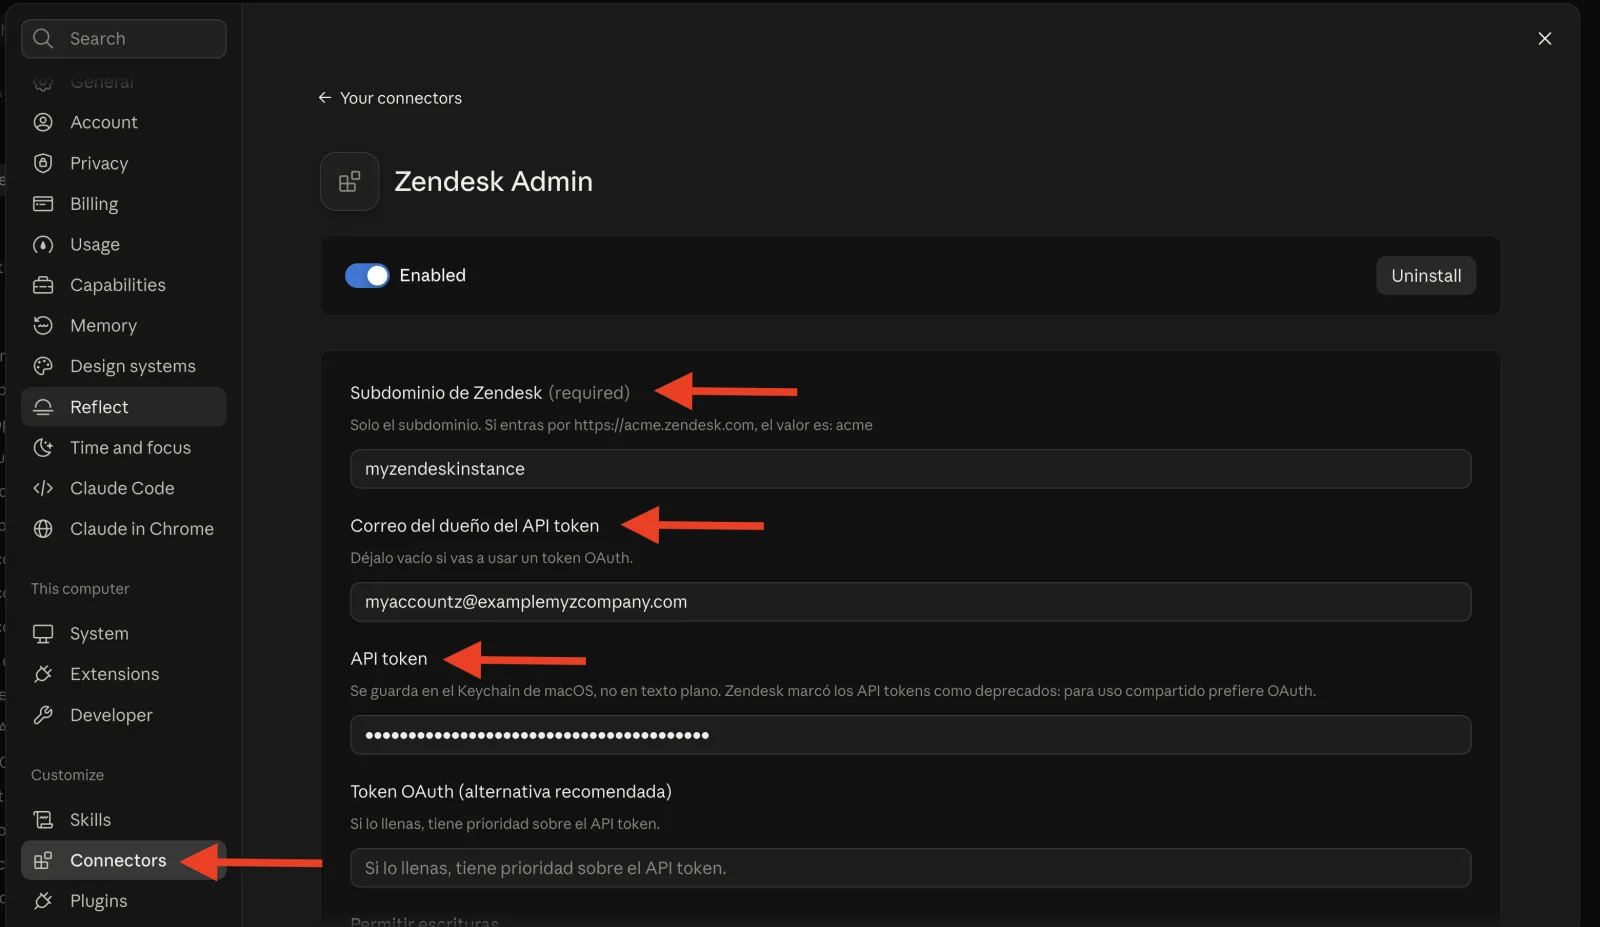
cp .env.example .envOpen the .env file and fill in three fields: your subdomain, your email and the token.
Watch out for the subdomain: it’s only the name. If you sign in at https://mycompany.zendesk.com, the value is mycompany. Nothing else.
4. Check that it works before connecting anything
python check_connection.pyThis tells you which account and role you’re connected with, and tests one by one the endpoints each tool uses. If something isn’t available on your plan, you find out here and not when it fails.
How to connect it to Claude
There are two paths. You can use both at the same time.
If you use Claude Code
One command and you’re done:
claude mcp add zendesk-admin \
  -- /absolute/path/.venv/bin/python /absolute/path/server.py
Use absolute paths, and restart Claude Code afterwards, because tools are registered at startup.
If you use the Claude app
Here it’s installed as an extension. First you package it:
./build_mcpb.shThat leaves a dist/ folder ready. Then, in the app: Settings → Extensions → Advanced settings → Install unpacked extension, and select that dist/ folder.
Two warnings I learned the hard way:
- Point to the
dist/folder, not the project folder. Onlydist/has what the app needs. - After installing, go to Settings → Connectors, open Zendesk Admin and fill in the subdomain, email and token there. Every time you reinstall the extension, that configuration is wiped and you have to enter it again.
Try it
Open a new conversation and type something like:
If it answers with your account and your role, you’re set. One detail: don’t type tool names as if they were commands. Describe the task in plain words and the assistant picks the tool.
What it doesn’t do yet, and what you should know first
- It runs on your computer, not in the cloud. That’s good for security: your token stays on your machine and nothing is exposed to the internet. But it means you can’t query it from your phone.
- The audit log is Enterprise-only. The recent configuration changes tool will tell you clearly if your plan doesn’t include it.
- The phone number belongs to the contact, not the ticket. If in your operation you store numbers in a custom ticket field instead of on the user profile, that search won’t find anything. Can it be done? Yes, but I didn’t include it in this version. Write to me if you’re interested in building more things like this.
- API tokens are deprecated. They work, and for a personal tool they’re enough. But if this grows to several people, move to OAuth. The server already accepts both, and OAuth is the recommended option.
If you want to use it
The repository is here: github.com/Grjhoan/Zendesk_MCP_Server.
It’s free software under the MIT license. Use it, change it, take it as a base to build your own. If your stack isn’t Zendesk but Freshdesk, Intercom or something else, the method is the same: first identify what you want to solve, check their API documentation before writing anything, and put the safety brakes in from day one.